Port Forwarding
Manage Port Forwarding
The Manage Port Forwarding window is used to create, start, stop, and otherwise manage port forwarding tasks. Port forwarding tasks can be launched on demand from this window or by calling LocalPortForward and RemotePortForward. Tasks can also be launched automatically at server connection time via server PortForwardingRules. To access this window, use Server→Port Forwarding or the ManagePortForwarding action.
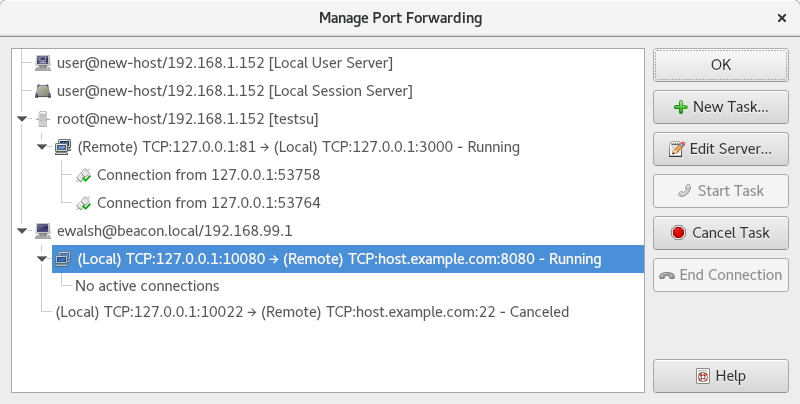
Example Manage Port Forwarding window.
The window has the following elements:
- Main Tree View
Displays a three-level hierarchy consisting of servers, port forwarding tasks, and individual socket connections. Each server entry contains:
- The server's
icon- The server's user, host, and name attributes
- In square brackets, the name of the connection over which the server is connected
Each task entry contains:
- The listening side (Local or Remote), socket type, and socket address.
- An arrow symbol
- The connecting side (Local or Remote), socket type, and socket address.
- The state of the task (Running, Canceled, etc.)
Each socket connection entry contains the source address of the incoming connection to the listening side. Running tasks with no active socket connections will display a string to that effect instead of connection entries.
- New Task
- Brings up a dialog box (described below) to create a new port forwarding task on the selected server.
- Edit Server
- Opens the selected server in a settings editor dialog. This can be used to edit the server's
PortForwardingRules, a list of saved port forwarding tasks which can be optionally started automatically at server connection time.- Start Task
- Restarts the selected task if it is not in the running state, as
RestartTaskdoes.- Cancel Task
- Cancels the selected task if it is in the running state, as
CancelTaskdoes.- End Connection
Terminates the selected socket connection, closing the socket on both ends. This is for removing unwanted or unexpected connections only.
Caution
How this is handled by the applications communicating over the socket will vary from application to application. It's possible that data loss may result. Use with caution.
Port Forwarding Editor
The Port Forwarding Editor is used to edit the list of saved port forwarding rules stored in the PortForwardingRules server setting.
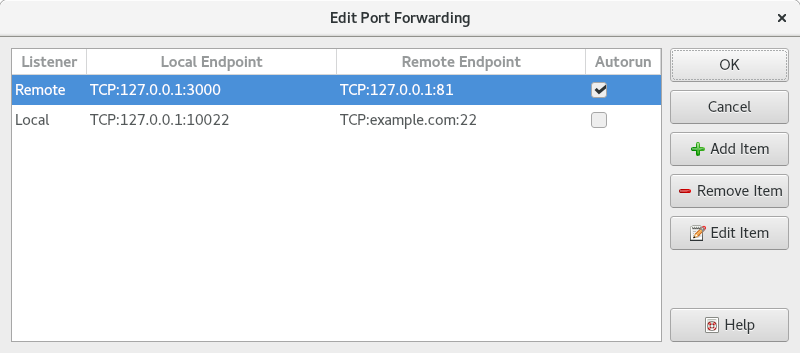
Example Port Forwarding Editor dialog.
The dialog has the following elements:
- Listener
- Whether each saved task is
localorremote.- Local Endpoint
- Each saved task's local endpoint
- Remote Endpoint
- Each saved task's remote endpoint
- Autorun
- Whether each saved task should be launched automatically at server connection time. Saved tasks can be launched on demand from the Manage Port Forwarding window.
- Add Item
- Brings up a dialog box (described below) to add a new saved task.
- Remove Item
- Removes the selected saved task
- Edit Item
- Brings up a dialog box (described below) to edit the selected saved task.
Port Forwarding Dialog
The Port Forwarding Dialog is used to specify an individual port forwarding task. It is shown from both the Manage Port Forwarding window and the Port Forwarding Editor.

Example Port Forwarding dialog.
The dialog has the following elements:
- Edit server to make permanent changes
- A reminder that port forwarding tasks created directly from the Manage Port Forwarding window are not saved. Click the link to edit the server settings instead. The relevant setting within the server is
Server/PortForwardingRules.- Forwarding type
- Choose whether the port forwarding task will listen for connections on the local (qtermy) side or the remote (termy-server) side.
- Listen type
- Choose the type of listening socket
- Listen address
Specify the address of the listening socket:
- For TCP sockets: the IP address or hostname to listen on. For a listening socket bound to all addresses, leave the address field empty.
- For Unix-domain sockets: the socket file path to listen on. It will be created but its parent directory must exist and be writable.
- Listen port
- Specify the port to listen on (TCP only)
- Connect type
- Choose the type of connecting socket
- Connect address
- Specify the destination IP address, hostname, or Unix-domain socket path
- Connect port
- Specify the destination port (TCP only)